前言
Fail2ban是一个使用python编写的日志分析工具。可以根据自定的规则来自动封禁满足条件的IP地址。Fail2ban可以用于各种情况下,本文将专注于使用Fail2ban来自动封禁SSH暴力破解的IP地址。 Read more “Linux下使用Fail2ban来阻止SSH爆破”
It's dangerous to go alone! Take this.
Fail2ban是一个使用python编写的日志分析工具。可以根据自定的规则来自动封禁满足条件的IP地址。Fail2ban可以用于各种情况下,本文将专注于使用Fail2ban来自动封禁SSH暴力破解的IP地址。 Read more “Linux下使用Fail2ban来阻止SSH爆破”
最近把热备的vps迁移到了阿里云国际版$4.5刀上面. 由于阿里云本身不支持原生IPv6, 只能使用tunnelbroker提供的隧道来实现IPv6的支持. FreeBSD 11的API和之前版本有一些不同,因此写一篇blog来记录官方推荐的IPv6隧道的配置.
以下为tunnelbroker的信息页
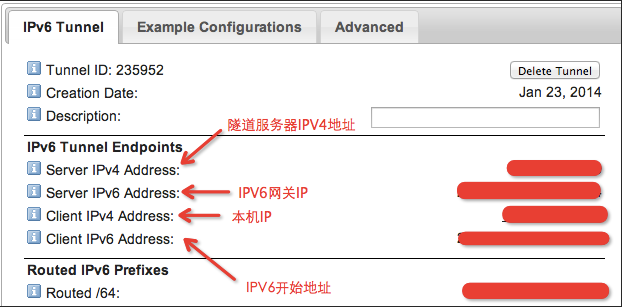
请在/etc/rc.conf最后加入下列配置, 请根据自己的IPv6信息修改配置.
# IPv6 Tunnel Client
ipv6_activate_all_interfaces="YES"
ifconfig_vtnet0_ipv6="inet6 IPv6地址 prefixlen 64"
cloned_interfaces="gif0"
ifconfig_gif0="tunnel 本机IP 隧道服务器IPv4地址"
ifconfig_gif0_ipv6="inet6 IPv6地址 IPv6网关IP prefixlen 128 mtu 1480"
ipv6_defaultrouter="-iface gif0"
重启网络和路由
service netif restart && service routing restart
现在你的IPv6地址应该就可以使用了.
当在Linux下修改了某个文件(夹)之后,如果需要把修改的部分分享出去,可以使用diff命令来创建patch(补丁)文件.
在使用diff命令创建patch之前,我们需要修改之前的原始文件,和修改过的新文件.
当为一个文件创建patch的时候可以使用以下代码:
diff -Naru file_orig.c file_updated.c > file.patch
其中
当需要为整个文件夹创建patch的时候可以使用以下代码:
diff -crB dir_orig dir > dfile.patch
其中
当你需要应用这个patch的时候可以运行
patch -p1 --dry-run < file.patch
其中参数-p[n]中的n值为需要跳过的目录数.
以/usr/src/linux为例:
若-p0就是不跳过任何目录,
-p1将跳过/,得到usr/src/linux,
-p2将跳过/usr,得到src/linux
绝大多数情况下这个值应该为1.
删除–dry-run当你满意输出到屏幕上的结果.
在OpenSUSE下使用以下命令可以禁用掉系统自带的防火墙.
通过防火墙
/sbin/SuSEfirewall2 off
使用Systemd来禁用防火墙
systemctl -q is-enabled SuSEfirewall2 && systemctl disable SuSEfirewall2 systemctl -q is-active SuSEfirewall2 && systemctl stop SuSEfirewall2
因为FreeBSD base包中带的dhclient不支持IPv6, 所以FreeBSD原生不支持DHCPv6. 但是如果我们可以使用dual-dhclient来让FreeBSD支持DHCPv6.
通过Pkg安装dual-dhclient
pkg install dual-dhclient
在/etc/rc.conf中加入以下配置来启用dual-dhclient
ipv6_activate_all_interfaces="YES"
dhclient_program="/usr/local/sbin/dual-dhclient"
ifconfig_DEFAULT="DHCP accept_rtadv"
重启网络
service netif restart
稍等片刻即可成功获取到IPv6地址.
参考: https://forums.freebsd.org/threads/60168/
一直以来都知道Spring支持一种叫做面向切面编程(AOP)的东西,但是一直都没有自己尝试使用过. 直到最近为了Debug方法,记录使用时间猛然发现AOP正好适合使用在这个场景下.为了灵活的使用AOP,我选择了使用注解来作为标记,当某个特定的注解被使用的时候将会自动触发这个切面.
1.注解的编写
package org.jzbk.rssplus.aspect.annotation;

import java.lang.annotation.*;

/**
 * Created by Kotarou on 2017/1/11.
 */
@Inherited
@Retention(RetentionPolicy.RUNTIME)
@Target({ElementType.TYPE, ElementType.METHOD})
public @interface Timed {
    boolean displayArgs() default false;
}
将注解设置为运行时RetentionPolicy.RUNTIME, 在编译时不会丢失这个注解信息.
设置注解主体为方法和类.
注解内部保存一个displayArgs的boolean变量,用于判断是否输出传入参数.
2. 编写AOP类
package org.jzbk.rssplus.aspect;

import org.aspectj.lang.ProceedingJoinPoint;
import org.aspectj.lang.Signature;
import org.aspectj.lang.annotation.Around;
import org.aspectj.lang.annotation.Aspect;
import org.aspectj.lang.annotation.Pointcut;
import org.aspectj.lang.reflect.MethodSignature;
import org.jzbk.rssplus.aspect.annotation.Timed;
import org.slf4j.Logger;
import org.slf4j.LoggerFactory;
import org.springframework.stereotype.Component;

import java.lang.reflect.Method;

/**
 * Created by Kotarou on 2017/1/11.
 */
@Aspect
@Component
public class TimedAOP {
    final private Logger logger = LoggerFactory.getLogger(getClass());

    @Pointcut("@annotation(org.jzbk.rssplus.aspect.annotation.Timed) || @target(org.jzbk.rssplus.aspect.annotation.Timed)")
    public void annotationProcessor() {
    }

    @Pointcut("execution(public * org.jzbk.rssplus..*.*(..))")
    public void publicMethod() {
    }

    @Around(value = "publicMethod() && annotationProcessor()")
    public Object count(ProceedingJoinPoint proceedingJoinPoint) throws Throwable {
        final String methodName = proceedingJoinPoint.getSignature().getName();

        Long startTime = System.currentTimeMillis();
        Object result = proceedingJoinPoint.proceed();
        Long finishTime = System.currentTimeMillis();

        Signature signature = proceedingJoinPoint.getSignature();
        String[] packageName = signature.getDeclaringTypeName().split("\\.");
        StringBuilder stringBuilder = new StringBuilder();

        for (int i = 0; i < packageName.length; ++i) {
            if (i < packageName.length - 1) {
                stringBuilder.append(packageName[i].substring(0, 1));
            } else {
                stringBuilder.append(packageName[i]);
            }
            stringBuilder.append(".");
        }

        logger.info("Executing: " + stringBuilder + signature.getName() + " took: " + (finishTime - startTime) + " ms");


        Method method = ((MethodSignature) proceedingJoinPoint.getSignature()).getMethod();

        if (method.getDeclaringClass().isInterface()) {
            method = proceedingJoinPoint.getTarget().getClass().getDeclaredMethod(methodName, method.getParameterTypes());
        }

        // 方法上的注解优先级比类上的注解高,可以覆盖类上注解的值
        Timed timed = null;
        if (method.isAnnotationPresent(Timed.class)) {
            //处理方法上的注解
            timed = method.getAnnotation(Timed.class);
            if (timed.displayArgs()) {
                logArgs(proceedingJoinPoint.getArgs());
            }
        } else {
            //处理类上面的注解
            Object target = proceedingJoinPoint.getTarget();
            if (target.getClass().isAnnotationPresent(Timed.class)) {
                timed = target.getClass().getAnnotation(Timed.class);
                if (timed.displayArgs()) {
                    logArgs(proceedingJoinPoint.getArgs());
                }
            }
        }

        return result;
    }

    private void logArgs(Object[] args) {
        StringBuilder stringBuilder = new StringBuilder();

        for (int i = 0; i < args.length; ++i) {
            stringBuilder.append("[");
            stringBuilder.append(i);
            stringBuilder.append("]: ");
            stringBuilder.append(args[i].toString());

            if (i < args.length - 1) {
                stringBuilder.append(", ");
            }
        }

        if (!stringBuilder.toString().isEmpty())
            logger.info("Argument List: " + stringBuilder);
        else
            logger.info("Argument List: Empty");
    }
}
AOP的切入点为使用了Timed的方法或者类.
方法上面的注解优先级比类上面的高,可以在方法上使用注解来覆盖掉类上注解的值.
演示:
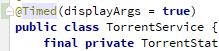
在类上面增加注解,并设置displayArgs为true
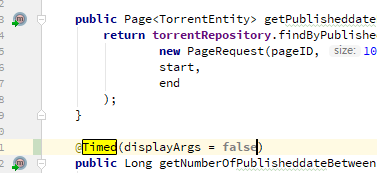
在某个方式上覆盖注解冰将displayArgs设置为false
运行tomcat,查看日志

结果和期望中的一样.
最近使用Spring Boot框架写了一个小网站.感觉Spring Boot写网站十分的优雅
本文将介绍如何在Spring Boot内引用Properties的值
1.开启文件扫描
2.在需要引入配置文件的Class上使用@PropertySource注解.
3.在Class中的属性上使用@Value注解来注入配置文件中的值.
演示
package org.jzbk.example.util;

import lombok.Getter;
import org.springframework.beans.factory.annotation.Value;
import org.springframework.context.annotation.PropertySource;
import org.springframework.stereotype.Component;

@Getter
@Component
@PropertySource(value = "classpath:versionInfo.properties")
public class VersionInfo {
    @Value("${example.platform}")
    private String platform;

    @Value("${example.version}")
    private String version;

    @Value("${example.branch}")
    private String branch;

    @Value("${example.buildDate}")
    private String buildDate;
}
因为家中使用的树莓派意外损坏,使用NAS上的虚拟机来代替原来树莓派的工作.在配置Munin的时候出现错误,当更新网络设备数据时,munin服务器端报错
2016/12/20 17:30:05 [INFO] creating rrd-file for if_ens3->down: '/var/lib/munin/ARCHLINUX/mx.ARCHLINUX-if_ens3-down-d.rrd'
2016/12/20 17:30:05 [ERROR] Unable to create '/var/lib/munin/ARCHLINUX/mx.ARCHLINUX-if_ens3-down-d.rrd': min must be less than max in DS definition
2016/12/20 17:30:05 [ERROR] In RRD: Error updating /var/lib/munin/ARCHLINUX/mx.ARCHLINUX-if_ens3-down-d.rrd: opening '/var/lib/munin/ARCHLINUX/mx.ARCHLINUX-if_ens3-down-d.rrd': No such file or directory
2016/12/20 17:30:05 [INFO] creating rrd-file for if_ens3->up: '/var/lib/munin/ARCHLINUX/mx.ARCHLINUX-if_ens3-up-d.rrd'
2016/12/20 17:30:05 [ERROR] Unable to create '/var/lib/munin/ARCHLINUX/mx.ARCHLINUX-if_ens3-up-d.rrd': min must be less than max in DS definition
2016/12/20 17:30:05 [ERROR] In RRD: Error updating /var/lib/munin/ARCHLINUX/mx.ARCHLINUX-if_ens3-up-d.rrd: opening '/var/lib/munin/ARCHLINUX/mx.ARCHLINUX-if_ens3-up-d.rrd': No such file or directory
在做了一些搜索之后发现文章 https://github.com/mail-in-a-box/mailinabox/issues/896
执行munin-run if_ens3 config 后出现以下输出
graph_order down up
graph_title ens3 traffic
graph_args --base 1000
graph_vlabel bits in (-) / out (+) per ${graph_period}
graph_category network
graph_info This graph shows the traffic of the ens3 network interface. Please note that the traffic is shown in bits per second, not bytes. IMPORTANT: On 32-bitsystems the data source for this plugin uses 32-bit counters, which makes the plugin unreliable and unsuitable for most 100-Mb/s (or faster) interfaces, where traffic is expected to exceed 50 Mb/s over a 5 minute period.  This means that this plugin is unsuitable for most 32-bit production environments. To avoid this problem, use the ip_ plugin instead.  There should be no problems on 64-bit systems running 64-bit kernels.
down.label received
down.type DERIVE
down.graph no
down.cdef down,8,*
down.min 0
up.label bps
up.type DERIVE
up.negative down
up.cdef up,8,*
up.min 0
up.max -1000000
up.info Traffic of the ens3 interface. Maximum speed is -1 Mb/s.
down.max -1000000
根据文章的内容,应用munin-monitoring/munin@f982751到插件中即可修复这个问题.
使用以下patch可以解决问题
--- if_.orig    2016-08-02 23:52:05.691224811 +0200
+++ if_ 2016-08-02 23:52:49.563223127 +0200
@@ -91,7 +91,7 @@
     # iwlist first)
     if [[ -r /sys/class/net/$INTERFACE/speed ]]; then
             SPEED=$(cat /sys/class/net/$INTERFACE/speed 2>/dev/null)
-            if [[ -n "$SPEED" ]]; then
+            if [ -n "$SPEED" -a "$SPEED" -gt "0" ]; then
                 echo $SPEED
                 return
             fi
前言:
Redisson是一个在Redis的基础上实现的Java驻内存数据网格(In-Memory Data Grid)。它不仅提供了一系列的分布式的Java常用对象,还提供了许多分布式服务。其中包括(BitSet, Set, Multimap, SortedSet, Map, List, Queue, BlockingQueue, Deque, BlockingDeque, Semaphore, Lock, AtomicLong, CountDownLatch, Publish / Subscribe, Bloom filter, Remote service, Spring cache, Executor service, Live Object service, Scheduler service) Redisson提供了使用Redis的最简单和最便捷的方法。Redisson的宗旨是促进使用者对Redis的关注分离(Separation of Concern),从而让使用者能够将精力更集中地放在处理业务逻辑上。 (摘自官方WIKI)
Redisson在3.2.0版本里新增了对Spring-Session整合的支持.本文将介绍整合Spring-Boot Spring-Session Redisson的方法
1. 添加依赖
Maven
<dependency>
   <groupId>org.springframework.session</groupId>
   <artifactId>spring-session</artifactId>
   <version>1.2.2.RELEASE</version>
</dependency>
<dependency>
   <groupId>org.redisson</groupId>
   <artifactId>redisson</artifactId>
   <version>3.2.0</version>
</dependency>
Gradle
compile 'org.springframework.session:spring-session:1.2.2.RELEASE'
compile group: 'org.redisson', name: 'redisson', version:'3.2.0'
2.创建配置文件RedisConfig.java
package org.jzbk.example.configuration;

import org.redisson.Redisson;
import org.redisson.api.RedissonClient;
import org.redisson.config.Config;
import org.redisson.spring.session.config.EnableRedissonHttpSession;
import org.springframework.context.annotation.Bean;
import org.springframework.core.io.ClassPathResource;

import java.io.IOException;

@EnableRedissonHttpSession
public class RedisConfig {
    @Bean(destroyMethod = "shutdown")
    public RedissonClient getRedis() throws IOException {
        return Redisson.create(
                Config.fromYAML(
                        new ClassPathResource("redisson.yaml").getInputStream()
                )
        );
    }
}
因为我的redisson.yaml在classpath根目录下,所以直接使用ClassPathResource,请根据实际情况来修改.
3.修改application.properties,增加下列配置
spring.session.store-type=redis
server.session.timeout=7200
4.启动项目,刷新页面即可看到成功整合成功.
参考: https://github.com/redisson/redisson/wiki/14.-Integration%20with%20frameworks#145-spring-session
通常,我使用Hibernate的@Cache(usage = CacheConcurrencyStrategy.NONSTRICT_READ_WRITE)注解来缓存@Entity类.
在JAP2规范内另一个注解@Cacheable有与Hibernate的@Cache的一样的功能使用@Cacheable的条件如下.
1.Entity Class实现Serializable接口
2.在Entity Class前加入@Cacheable(true)
例如
@Entity
@Cacheable(true)
public class UserEntity implements Serializable {
 // properties
}
3.在配置文件内开启缓存[1]
spring.jpa.properties.javax.persistence.sharedCache.mode=ENABLE_SELECTIVE
参考: http://docs.oracle.com/javaee/6/tutorial/doc/gkjio.html [1]
http://stackoverflow.com/questions/31585698/spring-boot-jpa2-hibernate-enable-second-level-cache