Linux下创建Patch的方法

当在Linux下修改了某个文件(夹)之后,如果需要把修改的部分分享出去,可以使用diff命令来创建patch(补丁)文件.

在使用diff命令创建patch之前,我们需要修改之前的原始文件,和修改过的新文件.

当为一个文件创建patch的时候可以使用以下代码:
diff -Naru file_orig.c file_updated.c > file.patch

其中

  • -N 将缺失文件视为空
  • -a 将所有文件视为文本文件
  • -r 递归比较所有子文件夹
  • -u 输出行数(默认 3)行


当需要为整个文件夹创建patch的时候可以使用以下代码:
diff -crB dir_orig dir > dfile.patch

其中

  • -c 输出行数(默认 3)行
  • -r 递归比较所有子文件夹
  • -B 忽略连续的换行符

当你需要应用这个patch的时候可以运行
patch -p1 --dry-run < file.patch
其中参数-p[n]中的n值为需要跳过的目录数.

以/usr/src/linux为例:

若-p0就是不跳过任何目录,

-p1将跳过/,得到usr/src/linux,

-p2将跳过/usr,得到src/linux

绝大多数情况下这个值应该为1.


删除–dry-run当你满意输出到屏幕上的结果.

Munin提示min must be less than max in DS definition

因为家中使用的树莓派意外损坏,使用NAS上的虚拟机来代替原来树莓派的工作.在配置Munin的时候出现错误,当更新网络设备数据时,munin服务器端报错

2016/12/20 17:30:05 [INFO] creating rrd-file for if_ens3-&gt;down: '/var/lib/munin/ARCHLINUX/mx.ARCHLINUX-if_ens3-down-d.rrd'
2016/12/20 17:30:05 [ERROR] Unable to create '/var/lib/munin/ARCHLINUX/mx.ARCHLINUX-if_ens3-down-d.rrd': min must be less than max in DS definition
2016/12/20 17:30:05 [ERROR] In RRD: Error updating /var/lib/munin/ARCHLINUX/mx.ARCHLINUX-if_ens3-down-d.rrd: opening '/var/lib/munin/ARCHLINUX/mx.ARCHLINUX-if_ens3-down-d.rrd': No such file or directory
2016/12/20 17:30:05 [INFO] creating rrd-file for if_ens3-&gt;up: '/var/lib/munin/ARCHLINUX/mx.ARCHLINUX-if_ens3-up-d.rrd'
2016/12/20 17:30:05 [ERROR] Unable to create '/var/lib/munin/ARCHLINUX/mx.ARCHLINUX-if_ens3-up-d.rrd': min must be less than max in DS definition
2016/12/20 17:30:05 [ERROR] In RRD: Error updating /var/lib/munin/ARCHLINUX/mx.ARCHLINUX-if_ens3-up-d.rrd: opening '/var/lib/munin/ARCHLINUX/mx.ARCHLINUX-if_ens3-up-d.rrd': No such file or directory


在做了一些搜索之后发现文章 https://github.com/mail-in-a-box/mailinabox/issues/896


执行munin-run if_ens3 config 后出现以下输出

graph_order down up
graph_title ens3 traffic
graph_args --base 1000
graph_vlabel bits in (-) / out (+) per ${graph_period}
graph_category network
graph_info This graph shows the traffic of the ens3 network interface. Please note that the traffic is shown in bits per second, not bytes. IMPORTANT: On 32-bitsystems the data source for this plugin uses 32-bit counters, which makes the plugin unreliable and unsuitable for most 100-Mb/s (or faster) interfaces, where traffic is expected to exceed 50 Mb/s over a 5 minute period.  This means that this plugin is unsuitable for most 32-bit production environments. To avoid this problem, use the ip_ plugin instead.  There should be no problems on 64-bit systems running 64-bit kernels.
down.label received
down.type DERIVE
down.graph no
down.cdef down,8,*
down.min 0
up.label bps
up.type DERIVE
up.negative down
up.cdef up,8,*
up.min 0
up.max -1000000
up.info Traffic of the ens3 interface. Maximum speed is -1 Mb/s.
down.max -1000000

根据文章的内容,应用munin-monitoring/munin@f982751到插件中即可修复这个问题.


使用以下patch可以解决问题

--- if_.orig    2016-08-02 23:52:05.691224811 +0200
+++ if_ 2016-08-02 23:52:49.563223127 +0200
@@ -91,7 +91,7 @@
     # iwlist first)
     if [[ -r /sys/class/net/$INTERFACE/speed ]]; then
             SPEED=$(cat /sys/class/net/$INTERFACE/speed 2&gt;/dev/null)
-            if [[ -n "$SPEED" ]]; then
+            if [ -n "$SPEED" -a "$SPEED" -gt "0" ]; then
                 echo $SPEED
                 return
             fi


使用Nginx来让Varnish支持HTTP/2

越来越多的公司开始使用HTTP/2来提高他们网站的性能以及用户体验. 开启HTTP/2的方法很简单,但是如何开启在HTTP/2与SSL 当你使用Varnish? 正如我们所了解的,Varnish 4.*不支持SSL, 我们需要找到一个方法来让这些组件协同工作.

HTTP/2

正如你所设想的, 互联网进步我们终于有了新版本的HTTP协议, 它主要的有点是:

-流与复用: 一个HTTP/2连接可以包含多个同时打开的流。请求的多路是由具有用它自己的流相关联的每个HTTP请求/响应交换实现的。流基本上是相互独立的,因此阻塞或失速请求或响应不会阻止上其他流的进展。

-报头压缩: 在HTTP / 1.1中,报头字段不被压缩,他们会不必要地占用带宽和增加延迟。在HTTP /2中,引入了一个新的压缩机制(HPACK)。它消除了冗余的报头字段,限制漏洞已知安全攻击,并具有在有限的环境使用有限的内存要求。

-服务器端推送: HTTP /2允许服务器先发制人发送(或“推”)的响应到客户端相关联地以前客户端发起的请求。当服务器知道客户端将需要具有以充分处理对原始请求的响应可用的那些响应这可能是有用的。

很多现代的浏览器已经支持HTTP/2, 在采取一些简单的操作开启HTTP/2之后,你将会收到预期的收益.

你也许可能能够在官方的文档中获取一些更多的点子:
– Hypertext Transfer Protocol Version 2 (HTTP/2) – RFC 7540

– HPACK: Header Compression for HTTP/2 – RFC 7541

为什么你需要HTTP/2

以上所有的解释都是很好的,但是有一些人喜欢直接看到结果或者直接去感受,直到那时候他们才会受到启发. 我所找到的一个最好的,令人印象深刻的DEMO由Akamai创建. 在Akamai的DEMO中,对比了加载一张相同的图片使用HTTP/1/1和HTTP/2. 如果你的浏览器支持HTTP/2, 我建议你自己体验一下Akamai的DEMO. 此外,为了应对HTTP /2,你必须启用SSL,它会提高你的网站的安全性。

Varnish的经典方案


一般Varnish作为前端使用,在用户与Web Server之间,架构看起来像这样:

architecture-basic

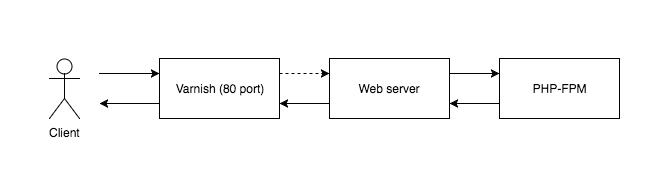
当我们有个客户请求了一个页面, 他的请求落到Varnish上(因为Varnish监听80端口), 然后Varnish检查这个对象是否已缓存,然后直接返回给客户不需要请求后端服务器或者请求后端服务器生成这个URL的页面.

现在的问题是 Varnish 4.*不支持浏览器所要求的 HTTP/2 SSL. 我们不能直接要求Varnish来监听443端口然后更改一些配置参数.

Nginx的解决方案

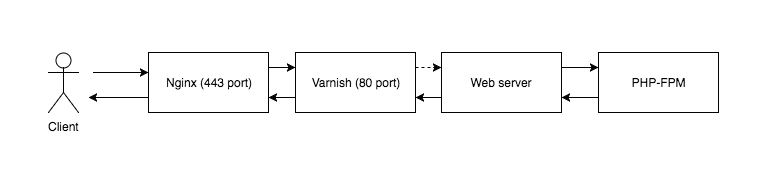
一个可能的方案就是在Varnish前增加Nginx. 它将会负责HTTP/2的请求, SSL以及发送请求到Varnish通过HTTP/1.1. 我们新的架构图将会看起来像这个样子:

architecture-ssl-http2

安装Nginx

最低版本要求为1.9.5(只有从这个版本开始ngx_http_v2_module 模块可用). 我是用的系统是Centos7, 因为Chrome最近移除了对SPDY的支持, 新的H2需要OpenSSL 1.0.2h才支持. Centos 7.x 源内自带的OpenSSL版本比较低并且Nginx不支持HTTP/2(包括Nginx的更新源). 想要使Nginx支持HTTP/2 我们使用以下脚本来编译自己的.src.rpm来增加HTTP/2的支持.

#!/bin/bash
yum -y groupinstall 'Development Tools'
yum -y install wget openssl-devel libxml2-devel libxslt-devel gd-devel perl-ExtUtils-Embed GeoIP-devel

OPENSSL="openssl-1.0.2h"
NGINX="nginx-1.11.3-1"

mkdir -p /opt/lib
wget https://www.openssl.org/source/$OPENSSL.tar.gz -O /opt/lib/$OPENSSL.tar.gz
tar -zxvf /opt/lib/$OPENSSL.tar.gz -C /opt/lib

rpm -ivh http://nginx.org/packages/mainline/centos/7/SRPMS/$NGINX.el7.ngx.src.rpm
sed -i "s|--with-http_ssl_module|--with-http_ssl_module --with-openssl=/opt/lib/$OPENSSL|g" /root/rpmbuild/SPECS/nginx.spec
rpmbuild -ba /root/rpmbuild/SPECS/nginx.spec
rpm -ivh /root/rpmbuild/RPMS/x86_64/$NGINX.el7.centos.ngx.x86_64.rpm


SSL证书

另一个我们需要的就是SSL证书, 我们可以使用Let’s Encrpty的免费证书,不过在这里出于演示的目的,我们使用OpenSSL来创建一个证书

openssl req -newkey rsa:2048 -sha256 -keyout jzbk.key -nodes -x509 -days 365 -out jzbk.crt

另一个重要的事情,在创建证书的时候,请输入你的域名当 Common Name 出现的时候. 如果你使用这个证书,你的浏览器将会提示这个证书不可信,出于测试的目的,请忽略这个提示.

配置 Nginx (HTTP/2, SSL)

好了,现在我们将证书文件复制到/etc/nginx下,然后开始配置Nginx

server {
    # 443 - default port for SSL
    listen 443 ssl http2;
    server_name <SERVER NAME>;
    # Specify the certificate files
    ssl_certificate jzbk.crt;
    ssl_certificate_key jzbk.kry;
 
    location / {
        # Set recommended by Nginx version
        proxy_http_version 1.1;
 
        proxy_pass http://127.0.0.1:80;
        proxy_set_header X-Real-IP  $remote_addr;
        proxy_set_header X-Forwarded-For $proxy_add_x_forwarded_for;
        proxy_set_header X-Forwarded-Proto https;
        proxy_set_header X-Forwarded-Port 443;
        proxy_set_header Host $host;
    }
}

设置Varnish

一个最简单的VCL如下

vcl 4.0;
 
backend local {
    .host = "127.0.0.1";
    .port = "8080";
}

之后请修改使你的Varnish监听80端口.

配置Web Server

WebServer我会选择Nginx, 我们已经设置了Varnish的后端服务器, 下面是一个最简单的Nginx配置Demo

server {
    # Listen the port configured in the Varnish *.vcl file.
    listen 8080;
 
    server_name <THE SAME SERVER NAME>;
    
    # Define trusted addresses that are known to send correct replacement addresses.
    set_real_ip_from   127.0.0.1;
    real_ip_header     X-Forwarded-For;
    real_ip_recursive on;
 
    #...
}

使用 Chrome 来测试

想要测试所有组件都正常工作,你可以安装一个Chrome的插件叫做 HTTP/2 and SPDY indicator

总结

使用Nginx或者Varnish来缓存并不重要, 但是你必须需要配置HTTP/2, 因为它是一个可以轻易实现的目标.


原文链接(有少许修改): https://victor.4devs.io/en/architecture/varnish-cache-http2-with-nginx.html

Nginx报错sched_setaffinity() failed

最近升级了VPS, 在启动Nginx之后发现nginx_error.log不为空出现sched_setaffinity() 的错误:

2016/08/14 15:47:39 [alert] 9443#0: sched_setaffinity() failed (22: Invalid argument)

Google之后发现,是worker_cpu_affinity指令设置错误导致的问题.

worker_cpu_affinity命令是设置Nginx进程与CPU进行绑定的.可以充分的利用多核/线程的性能

双核机器根据互联网上的说明设置如下,

worker_processes  2;  
worker_cpu_affinity 01 10;


根据测试,worker_cpu_affinity设置为01 10会出现报错.

正确设置

worker_processes  2;  
worker_cpu_affinity 00000001 00000010;


修改nginx.conf之后重启nginx就没有报错了.

Ubuntu12.04 更新源

1、修改更新源
sudo vi /etc/apt/sources.list (打开Ubuntu 12.04源列表文件)
2、清空sources.list, 将下面的代码粘贴进去

#台湾源 
deb http://tw.archive.ubuntu.com/ubuntu/ precise main universe restricted multiverse 
deb-src http://tw.archive.ubuntu.com/ubuntu/ precise main universe restricted multiverse 
deb http://tw.archive.ubuntu.com/ubuntu/ precise-security universe main multiverse restricted 
deb-src http://tw.archive.ubuntu.com/ubuntu/ precise-security universe main multiverse restricted 
deb http://tw.archive.ubuntu.com/ubuntu/ precise-updates universe main multiverse restricted 
deb-src http://tw.archive.ubuntu.com/ubuntu/ precise-updates universe main multiverse restricted 

#网易 Ubuntu 11.10 源(速度很快) 
deb http://mirrors.163.com/ubuntu/ precise main universe restricted multiverse 
deb-src http://mirrors.163.com/ubuntu/ precise main universe restricted multiverse 
deb http://mirrors.163.com/ubuntu/ precise-security universe main multiverse restricted 
deb-src http://mirrors.163.com/ubuntu/ precise-security universe main multiverse restricted 
deb http://mirrors.163.com/ubuntu/ precise-updates universe main multiverse restricted 
deb http://mirrors.163.com/ubuntu/ precise-proposed universe main multiverse restricted 
deb-src http://mirrors.163.com/ubuntu/ precise-proposed universe main multiverse restricted 
deb http://mirrors.163.com/ubuntu/ precise-backports universe main multiverse restricted 
deb-src http://mirrors.163.com/ubuntu/ precise-backports universe main multiverse restricted 
deb-src http://mirrors.163.com/ubuntu/ precise-updates universe main multiverse restricted 

#骨头源,骨头源是bones7456架设的一个Ubuntu源 ,提供ubuntu,deepin 
deb http://ubuntu.srt.cn/ubuntu/ precise main universe restricted multiverse 
deb-src http://ubuntu.srt.cn/ubuntu/ precise main universe restricted multiverse 
deb http://ubuntu.srt.cn/ubuntu/ precise-security universe main multiverse restricted 
deb-src http://ubuntu.srt.cn/ubuntu/ precise-security universe main multiverse restricted 
deb http://ubuntu.srt.cn/ubuntu/ precise-updates universe main multiverse restricted 
deb http://ubuntu.srt.cn/ubuntu/ precise-proposed universe main multiverse restricted 
deb-src http://ubuntu.srt.cn/ubuntu/ precise-proposed universe main multiverse restricted 
deb http://ubuntu.srt.cn/ubuntu/ precise-backports universe main multiverse restricted 
deb-src http://ubuntu.srt.cn/ubuntu/ precise-backports universe main multiverse restricted 
deb-src http://ubuntu.srt.cn/ubuntu/ precise-updates universe main multiverse restricted 

#mirror.lupaworld.com的源,速度很快 
deb http://mirror.lupaworld.com/ubuntu/archive/ precise main restricted universe multiverse 
deb http://mirror.lupaworld.com/ubuntu/archive/ precise-security main restricted universe multiverse 
deb http://mirror.lupaworld.com/ubuntu/archive/ precise-updates main restricted universe multiverse 
deb http://mirror.lupaworld.com/ubuntu/archive/ precise-backports main restricted universe multiverse 
deb http://mirror.lupaworld.com/ubuntu/ubuntu-cn/ precise main restricted universe multiverse 

#ubuntu.cn99.com源(推荐): 
deb http://ubuntu.cn99.com/ubuntu/ precise main restricted universe multiverse 
deb http://ubuntu.cn99.com/ubuntu/ precise-updates main restricted universe multiverse 
deb http://ubuntu.cn99.com/ubuntu/ precise-security main restricted universe multiverse 
deb http://ubuntu.cn99.com/ubuntu/ precise-backports main restricted universe multiverse 
deb http://ubuntu.cn99.com/ubuntu-cn/ precise main restricted universe multiverse 

#电子科技大学 
deb http://ubuntu.uestc.edu.cn/ubuntu/ precise main restricted universe multiverse 
deb http://ubuntu.uestc.edu.cn/ubuntu/ precise-backports main restricted universe multiverse 
deb http://ubuntu.uestc.edu.cn/ubuntu/ precise-proposed main restricted universe multiverse 
deb http://ubuntu.uestc.edu.cn/ubuntu/ precise-security main restricted universe multiverse 
deb http://ubuntu.uestc.edu.cn/ubuntu/ precise-updates main restricted universe multiverse 
deb-src http://ubuntu.uestc.edu.cn/ubuntu/ precise main restricted universe multiverse 
deb-src http://ubuntu.uestc.edu.cn/ubuntu/ precise-backports main restricted universe multiverse 
deb-src http://ubuntu.uestc.edu.cn/ubuntu/ precise-proposed main restricted universe multiverse 
deb-src http://ubuntu.uestc.edu.cn/ubuntu/ precise-security main restricted universe multiverse 
deb-src http://ubuntu.uestc.edu.cn/ubuntu/ precise-updates main restricted universe multiverse 

#中国科技大学 
deb http://debian.ustc.edu.cn/ubuntu/ precise main restricted universe multiverse 
deb http://debian.ustc.edu.cn/ubuntu/ precise-backports restricted universe multiverse 
deb http://debian.ustc.edu.cn/ubuntu/ precise-proposed main restricted universe multiverse 
deb http://debian.ustc.edu.cn/ubuntu/ precise-security main restricted universe multiverse 
deb http://debian.ustc.edu.cn/ubuntu/ precise-updates main restricted universe multiverse 
deb-src http://debian.ustc.edu.cn/ubuntu/ precise main restricted universe multiverse 
deb-src http://debian.ustc.edu.cn/ubuntu/ precise-backports main restricted universe multiverse 
deb-src http://debian.ustc.edu.cn/ubuntu/ precise-proposed main restricted universe multiverse 
deb-src http://debian.ustc.edu.cn/ubuntu/ precise-security main restricted universe multiverse 
deb-src http://debian.ustc.edu.cn/ubuntu/ precise-updates main restricted universe multiverse 

#北京理工大学 
deb http://mirror.bjtu.edu.cn/ubuntu/ precise main multiverse restricted universe 
deb http://mirror.bjtu.edu.cn/ubuntu/ precise-backports main multiverse restricted universe 
deb http://mirror.bjtu.edu.cn/ubuntu/ precise-proposed main multiverse restricted universe 
deb http://mirror.bjtu.edu.cn/ubuntu/ precise-security main multiverse restricted universe 
deb http://mirror.bjtu.edu.cn/ubuntu/ precise-updates main multiverse restricted universe 
deb-src http://mirror.bjtu.edu.cn/ubuntu/ precise main multiverse restricted universe 
deb-src http://mirror.bjtu.edu.cn/ubuntu/ precise-backports main multiverse restricted universe 
deb-src http://mirror.bjtu.edu.cn/ubuntu/ precise-proposed main multiverse restricted universe 
deb-src http://mirror.bjtu.edu.cn/ubuntu/ precise-security main multiverse restricted universe 
deb-src http://mirror.bjtu.edu.cn/ubuntu/ precise-updates main multiverse restricted universe 

#兰州大学 
deb ftp://mirror.lzu.edu.cn/ubuntu/ precise main multiverse restricted universe 
deb ftp://mirror.lzu.edu.cn/ubuntu/ precise-backports main multiverse restricted universe 
deb ftp://mirror.lzu.edu.cn/ubuntu/ precise-proposed main multiverse restricted universe 
deb ftp://mirror.lzu.edu.cn/ubuntu/ precise-security main multiverse restricted universe 
deb ftp://mirror.lzu.edu.cn/ubuntu/ precise-updates main multiverse restricted universe 
deb ftp://mirror.lzu.edu.cn/ubuntu-cn/ precise main multiverse restricted universe 

#上海交通大学 
deb http://ftp.sjtu.edu.cn/ubuntu/ precise main multiverse restricted universe 
deb http://ftp.sjtu.edu.cn/ubuntu/ precise-backports main multiverse restricted universe 
deb http://ftp.sjtu.edu.cn/ubuntu/ precise-proposed main multiverse restricted universe 
deb http://ftp.sjtu.edu.cn/ubuntu/ precise-security main multiverse restricted universe 
deb http://ftp.sjtu.edu.cn/ubuntu/ precise-updates main multiverse restricted universe 
deb http://ftp.sjtu.edu.cn/ubuntu-cn/ precise main multiverse restricted universe 
deb-src http://ftp.sjtu.edu.cn/ubuntu/ precise main multiverse restricted universe 
deb-src http://ftp.sjtu.edu.cn/ubuntu/ precise-backports main multiverse restricted universe 
deb-src http://ftp.sjtu.edu.cn/ubuntu/ precise-proposed main multiverse restricted universe 
deb-src http://ftp.sjtu.edu.cn/ubuntu/ precise-security main multiverse restricted universe 
deb-src http://ftp.sjtu.edu.cn/ubuntu/ precise-updates main multiverse restricted universe 

3、通知ubuntu启用新的更新源

sudo apt-get update

Linux下查找文件内容


Linux查找文件内容的常用命令方法:


1、从文件内容查找匹配指定字符串的行:

$ grep “被查找的字符串” 文件名


2、从文件内容查找与正则表达式匹配的行:

$ grep –e “正则表达式” 文件名


3、查找时不区分大小写:

$ grep –i “被查找的字符串” 文件名


4、查找匹配的行数:

$ grep -c “被查找的字符串” 文件名


5、从文件内容查找不匹配指定字符串的行:

$ grep –v “被查找的字符串” 文件名


6、从根目录开始查找所有扩展名为.log的文本文件,并找出包含”ERROR”的行

find / -type f -name “*.log” | xargs grep “ERROR”


7、例子 :查找/SqLogs/access.log文件中包含”.exe” 或者”TCP_DENIED”的记录

方法1:grep /SqLogs/access.log –e “.exe”

grep /SqLogs/access.log –e “TCP_DENIED”

方法2:find /SqLogs –type f –name access.log | xargs grep “.exe”

find /SqLogs –type f –name access.log | xargs grep “TCP_DENIED”


ArchLinux包管理器pacman和yaourt简明用法

1.升级系统

pacman -Syu

2.升级系统,附带升级从aur安装的软件包

yaourt -Syu –aur

注:这条命令的确切意思是升级系统,从AUR升级本地软件数据库并安装更新。

3.安装包

pacman -S package_name
pacman -Sf package_name #重新安装软件包

4.只下载你要的包

pacman -Sw package_name

5.安装下载的包到指定目录

pacman -U /path/to/package/package_name-version.pkg.tar.gz

6.删除已安装的软件

pacman -R package_name
pacman -Rs package_name #卸载包的同时卸载相关依赖

注:-R和-Rs参数同样适用于yaourt。

7.查找包

pacman -Ss package
yaourt foo #会列出所有匹配foo的包,用户可选择安装。

8.查看本地包

pacman -Qi package #显示包信息
pacman -Ql package #显示包安装位置

9.清空cache

pacman -Scc

用pacman 安装的时候,下的包会在/var/cache 这个目录,你会发现这个文件夹很大

yaourt的其他用法:

yaourt -Si package_name #列出软件包信息
yaourt -Sc #从缓存中清楚旧的软件包
yaourt -Su #安装AUR中的更新软件包
yaourt -Sy #获取最新的AUR软件包数据库
yaourt -Cd #清除AUR软件包数据库


ArchLinux安装要点

1.安装文件包时记得设置DNS。

2.安装完成后首先设置Pacman镜像
nano /etc/pacman.d/mirrorlist
找到CN,去掉Server前面的#,Ctrl+X退出。

3.更新源列表,执行:

pacman -Syu

4.设置签名全部信任(如不设置会十分麻烦)
nano /etc/pacman.conf
在 Architecture = auto 下新增

SigLevel = Optional TrustAll

5.更新系统

pacman -Sy pacman
pacman -Su

6.安装yaourt(32位系统)
nano pacman.conf 最后添加:

[archlinuxfr]
Server = http://repo.archlinux.fr/i686

然后执行 pacman -Sy yaourt curl

ArchLinux上关闭IPv6的方法

IPv6日历历在目,为啥要关呢?我归纳为:洁癖,这和性能或内存啥的没关系。所谓的洁癖是指执行

netstat -lntp

类命令时,输出能清爽一点。

:::*

实在太丑了!

不管怎样,让我们来看看怎样在Arch linux有有效的关闭

IPv6

吧…

正确方法

其实Arch linux的wiki专门介绍过关闭IPv6: Disabling IPv6, 但尝试后发现method1和method2都不管用,必须重新生成一个

initramfs

。对于像我这样的菜鸟,还是列出命令更实惠:

首先编辑

/etc/modprobe.d/modprobe.conf

,添加:

options ipv6 disable=1

然后编辑

/etc/mkinitcpio.conf

,添加:

FILES="/etc/modprobe.d/modprobe.conf"

最后执行命令,并重启:

sudo mkinitcpio -p linux

注意:

  1. 不确定这是最好的办法,因为要重启服务器
  2. 如果
    initramfs

    不是用默认的linux模板,那

    -p linux

    要做相应修改